1、添加扩展:
# 第一种:
composer require php-imap/php-imap
# 第二种:
composer require phpmailer/phpmailer
2、这里采用第二种方式:
<?php
declare(strict_types=1);

namespace App\Controller\v1\email;


use App\Controller\AbstractController;
use PhpImap\Exception;
use PhpImap\Mailbox;
use PHPMailer\PHPMailer\PHPMailer;
use PHPMailer\PHPMailer\SMTP;

/**
 * Desc: 电子邮件相关
 */
class EmailController extends AbstractController
{

    public const imapServer = '{imap.qq.com:993/imap/ssl}'; // QQ 邮箱的 IMAP 服务器地址
    public const imapUsername = '11***039@qq.com'; // 您的 QQ 邮箱地址
    public const imapPassword = '***';  // 您的 QQ 邮箱密码
    public const attachmentPath = BASE_PATH . '/storage/email/'; // 您的 附件 保存目录


    /**
     * Desc: 方法一 邮件发送与接收 -- 如果乱码需要配置 GB2312  UTF-8
     * Date: 2023-10-31 18:38
     * @return \Psr\Http\Message\ResponseInterface
     */
    public function receiveMailWithAttachments()
    {
        $params = $this->request->post();
        $imapServer = $params['imapServer'] ?? self::imapServer; // QQ 邮箱的 IMAP 服务器地址
        $smtpServer = $params['smtpServer'] ?? self::imapServer; // QQ 邮箱的 smtp 服务器地址
        $imapUsername = $params['imapUsername'] ?? self::imapUsername; // 您的 QQ 邮箱地址
        $imapPassword = $params['imapPassword'] ?? self::imapPassword; // 您的 QQ 邮箱密码
        var_dump($imapServer, $smtpServer, $imapUsername, $imapPassword);
        $mail = new PHPMailer(true);
        try {
            //Server settings
            $mail->SMTPDebug = SMTP::DEBUG_SERVER;                      //Enable verbose debug output
            $mail->isSMTP();                                            //Send using SMTP
            $mail->Host = $smtpServer;//'smtp.example.com';                     //Set the SMTP server to send through
            $mail->SMTPAuth = true;                                   //Enable SMTP authentication
            $mail->Username = $imapUsername;//'user@example.com';                     //SMTP username
            $mail->Password = $imapPassword;                               //SMTP password
            $mail->SMTPSecure = PHPMailer::ENCRYPTION_SMTPS;            //Enable implicit TLS encryption
            $mail->Port = 465;                                    //TCP port to connect to; use 587 if you have set `SMTPSecure = PHPMailer::ENCRYPTION_STARTTLS`

            //测发送 -- 成功
            $mail->setFrom($imapUsername, 'Mailer');
            $mail->addAddress('28***511@qq.com', 'John Doe');
            $mail->Subject = 'PHPMailer SMTP test';
            $mail->Body = 'This is a test email message';
            if (!$mail->send()) {
                echo 'Message could not be sent.' . "\n";
                echo 'Mailer Error: ' . $mail->ErrorInfo . "\n";
            } else {
                echo 'Message has been sent' . "\n";
            }

            $msg_id = $mail->getLastMessageID();
            echo "LastMessageID => " . $msg_id . "\n";

            //测收件
            $inbox = imap_open($imapServer, $imapUsername, $imapPassword);
            $result = imap_search($inbox, 'UNSEEN');

            foreach ($result as $mail_id) {
                $structure = imap_fetchstructure($inbox, $mail_id);
                for ($i = 0; $i < count($structure->parts); $i++) {
                    if ($structure->parts[$i]->ifdparameters) {
                        foreach ($structure->parts[$i]->dparameters as $object) {
                            if (strtolower($object->attribute) == 'filename') {
                                $filename = $object->value;
                                $file_data = imap_fetchbody($inbox, $mail_id, (string)($i + 1));
                                $file_mime = imap_fetchmime($inbox, $mail_id, (string)($i + 1));
                                $file_text = imap_fetchtext($inbox, $mail_id);
                                $file_structure = imap_fetchstructure($inbox, $mail_id);
                                // 处理附件内容...
                                var_dump('读取1 file:[' . $mail_id . ']', $filename, $file_mime, $file_text, $file_structure);

                                // 将附件保存到指定目录
                                file_put_contents(self::attachmentPath . $filename, $file_data);
                            }
                        }
                    }
                }
            }
            imap_close($inbox);
        } catch (\Throwable $e) {
            echo "Message could not be sent. Mailer Error: {$mail->ErrorInfo}";
            var_dump($e->getLine() . ' ' . $e->getMessage());
        }
        return response_api(null, 'success');
    }


    /** 方法二 邮件接收
     * @throws Exception
     */
    public function receiveMailWithAttachmentsImap()
    {
        $params = $this->request->post();
        $imapServer = $params['imapServer'] ?? self::imapServer; // QQ 邮箱的 IMAP 服务器地址
        $smtpServer = $params['smtpServer'] ?? self::imapServer; // QQ 邮箱的 smtp 服务器地址
        $imapUsername = $params['imapUsername'] ?? self::imapUsername; // 您的 QQ 邮箱地址
        $imapPassword = $params['imapPassword'] ?? self::imapPassword; // 您的 QQ 邮箱密码
        $attachmentPath = $params['attachmentPath'] ?? self::attachmentPath; // 您的附件存放地址
        var_dump($imapServer, $smtpServer, $imapUsername, $imapPassword);
        $mailbox = new PHPMailer(true);
        $mailbox->isSMTP();
        $mailbox = new Mailbox($imapServer, $imapUsername, $imapPassword, $attachmentPath);

        $mailIds = $mailbox->searchMailbox('UNSEEN'); // 搜索未读邮件
        var_dump('-------------2--------------', $mailIds);
        foreach ($mailIds as $mailId) {
            $email = $mailbox->getMail($mailId);

            // 获取邮件主题、发件人、正文等信息
            $subject = $email->subject;//正文text内容
            $from = $email->fromName;//发送者 **@qq.com
            $textHtml = $email->textHtml;//正文html内容
            $date = $email->date;//收件时间
            $getAttachments = $email->getAttachments();//附件数组
            $fromAddress = $email->fromAddress;//来件者地址名称 **@qq.com
            $fromName = $email->fromName;//来件者姓名

            var_dump($subject);
            var_dump($from);
            var_dump($textHtml);
            var_dump($date);
            var_dump($getAttachments);
            var_dump($fromAddress);
            var_dump($fromName);
            // 处理附件
//            foreach ($getAttachments as $attachment) {
//                $filename = $attachment->name;
//                $filePath = $attachment->filePath;
//
//                // 将附件保存到指定目录
                file_put_contents($attachmentPath . $filename, $contents);
//            }

            // 在这里可以执行你的逻辑,例如将邮件信息写入数据库或者进行其他处理
        }
    }

}
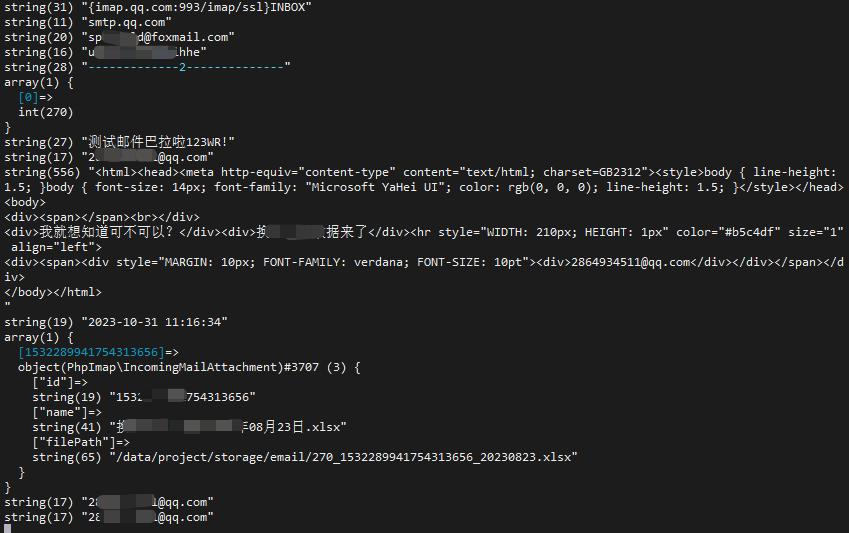
方法二结果如图所示:

以上就是php实现收发邮件的方法详解的详细内容,更多关于php收发邮件的资料请关注插件窝其它相关文章!